
Software-based routers have always played a role in the Internet, and are becoming increasingly important in data centers due to the convergence of video, mobile, and cloud services. Data traffic no longer moves simply from the subscriber into the network and then out again. Instead, most of the traffic is located inside the data center between various application servers within the network.
All this traffic can be routed easily using software-based routers running on commodity PC hardware. Such a router looks like just another server in the data center, and most of the time it is implemented using open-source software. The availability of the source code and the right to modify the software enables the unlimited tuning and optimization of the network traffic.
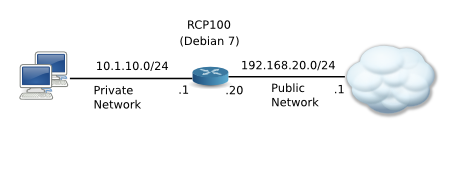
This article describes how to set up RCP100 routing suite on a Debian 7 computer. RCP100 is a full OSPF/RIP router for Linux. It works on 64bit computers, it is licensed under GPL, and it is actively developed.
The computer I am setting up has two Ethernet interfaces, eth0 (192.168.20.20) and eth1 (10.1.10.1), and it is meant to connect a small private network segment (10.1.10.0/24) to the larger public network. To isolate the private network, I configure Network Address Translation on the router and enable the firewall. Computers on the private network are assigned IP addresses using DHCP. The router also provides NTP and DNS proxy services.
Network setup
Manual network configuration
Before going any further, we need to configure the network manually on our Debian box. In sharp contrast to servers and workstations, routers are configured with fixed IP addresses. In Debian the manual configuration is entered in /etc/network/interfaces file as follows:
auto eth0
iface eth0 inet static
        address 192.168.20.20
        netmask 255.255.255.0
        gateway 192.168.20.1

auto eth1
iface eth1 inet static
        address 10.1.10.1
        netmask 255.255.255.0
192.168.20.1 is our default gateway address. All the traffic from our private network going outside will be forwarded to this IP address. To translate names to IP addresses we also need to define some DNS nameservers in /etc/resolv.conf. I’ve picked up in this example two well known public DNS servers provided by Google, you might want to replace them with DNS servers provided by your ISP.
nameserver 8.8.8.8
nameserver 8.8.4.4
After changing the configuration we need to restart the networking service:
$ sudo /etc/init.d/networking restart
RCP100 software installation
Download RCP100 surce code archive, compile it, and install it as follows:
$ tar -xjvf rcp100-X.Y.Z.tar.bz2
$ cd rcp100-X.Y.Z
$ ./configure
$ make
$ sudo make install
The software is self-contained in /opt/rcp directory. Removing it is just a matter of deleting the directory. The router is started by running start.sh script:
$ sudo /opt/rcp/bin/start.sh
First time you start the software, the router detects the existing interface setup and imports it in its own configuration. You can modify it later directly in the router configuration.
Command Line Interface
RCP100 features a Cisco-style command line interface (CLI) accessible by telnet. Most commands have the same syntax as Cisco’s, any differences can be easily figured out using the on-screen help system. Use rcp/rcp as default user/password for login.
$ telnet 127.0.0.1
Trying 127.0.0.1...
Connected to 127.0.0.1.
Escape character is '^]'.
User: rcp
Password:
rcp> ?
  enable                      Administration mode
  exit                        Exit the current mode
  logout                      Exit the session
  no                          Negate a command or set its defaults
  ping                        Send echo messages
  show                        Show running system information
  telnet-client               Open a telnet session
  traceroute                  Trace route to destination
rcp>
rcp>enable
rcp#config
rcp(config)#
CLI takes a little bit to get used to it. It is used however by most commercial routers out there, if you can handle one of them you can handle all. Until that happens, you will relay on documentation and on-screen help.
In a CLI session, the help can be accessed at any time using ? key, and command completion is activated using TAB. It is not necessary to type the full command, most of the time only a few letters will do it.
The commands are hierarchically structured. As you login you are in unprivileged mode. In this mode you can not modify the configuration. From here you go in privileged mode using enable command and in configuration mode using config command. As you go from one mode to another the prompt changes. You can type exit to go back to the previous mode, and logout to exit the telnet session.

CLI states
First login it is advisable to change the default passwords for telnet and http access:
rcp(config)#administrator rcp password mysupersecretpassword
rcp(config)#service http password mysupersecretpassword
The router modifies the running configuration as the commands are entered. To have the configuration stored on the hard disk and applied automatically in case the computer is restarted, we need to execute copy run start command. To display the current running configuration the command is show configuration.
*** save configuration ***

rcp(config)#copy run start

*** display current running configuration ***

rcp(config)#show configuration
Interface configuration
Use show interface command to display the current interface status. In case you need to change the IP addresses, go in interface mode and use ip address command. Don’t forget to save the configuration using copy run start:
*** check interfaces ***

rcp#show interface
Interface        Type         IP                      Status (admin/link)
eth0             ethernet     192.168.20.20/24        UP/UP
eth1             ethernet     10.1.10.1/24            UP/UP
lo               loopback     127.0.0.1/8             UP/UP
br0              bridge       0.0.0.0/0               DOWN/DOWN
br1              bridge       0.0.0.0/0               DOWN/DOWN

*** modify interface address ***

rcp(config)#interface ethernet eth1
rcp(config-if eth1)#ip address 10.1.10.1/24
rcp(config-if eth1)#copy run start
rcp(config-if eth1)#exit
rcp(config)#
Static routes
Our default gateway was detected automatically and it should be present in the routing table. In case it is not, we can add it with ip default-gateway command. Removing a default route is just a mater of adding a no in front of the command we used to configure it – this is true for most CLI commands:
*** check routing table ***

rcp#show ip route
Codes: C - connected, S - static, R - RIP, B - blackhole, O - OSPF
IA - OSPF inter area, E1 - OSPF external type 1, E2 - OSPF external type 2

S    0.0.0.0/0[0/0] via 192.168.20.1, eth0
C    10.1.10.0/24 is directly connected, eth1
C    192.168.20.0/24 is directly connected, eth0

*** add and remove a default gateway ***

rcp(config)#ip default-gateway 192.168.20.1
rcp(config)#no ip default-gateway 192.168.20.1
To add static routes use ip route command. You will need to specify the network destination (1.2.3.0/24 in the example below) and the next hop address (192.168.20.1). Optionally, you can specify an administrative distance for this route (default 1). The smaller the administrative distance the higher the precedence of the route in the routing table.
rcp(config)#ip route 1.2.3.0/24 192.168.20.1
rcp(config)#no ip route 1.2.3.0/24 192.168.20.1
NAT and Firewall
The command format to enable network address translation in RCP100 is ip nat masquerade internal_network outside_interface. In our case the internal network is the private network 10.1.10.0/24, and the outside interface is eth0 (192.168.20.20):
rcp(config)#ip nat masquerade 10.1.10.0/24 eth0
Once NAT is enabled, all packets from 10.1.10.0/24 network going outside will have the source IP address replaced with 192.168.20.20, eth0 acting like a proxy for all computers on internal network. None of the hosts on our internal network are ever seen directly from the outside network, the only host visible from outside is the masquerade machine itself.
Even with NAT enabled, there are still cases when our computers can still be reached directly from outside network. One such case is somebody sending packets on interface eth0 pretending to be on 10.1.10.0/24 network. Our router will forward these packets unless told specifically not to. This is implemented using Access Control Lists (ACL) as follows:
rcp(config)#access-list 100 deny  10.1.10.0/24  any
rcp(config)#access-list 100 deny  any  out-interface eth0
rcp(config)#access-list 100 deny  any  any  new,invalid
rcp(config)#interface ethernet eth0
rcp(config-if eth0)ip access-group 100 forward
rcp(config-if eth0)exit
rcp(config)#
We also need to limit our router access over telnet (port 23) and http (port 80) from outside network.
rcp(config)#access-list 101 deny tcp any  any 23 new,invalid
rcp(config)#access-list 101 deny tcp any  any 80 new,invalid
rcp(config)#interface ethernet eth0
rcp(config-if eth0)ip access-group 101 in
rcp(config-if eth0)exit
rcp(config)#
Services
The first service to be enabled is Network Time Protocol (NTP). We want computers on our private network to be able to synchronize the time with a local NTP server running on the router. The configuration is as follows:
ntp server nist1-nj.ustiming.org
ntp server nist1-pa.ustiming.org
ip ntp server
www.pool.ntp.org lists thousands of public NTP servers you can use for synchronization. Try to pick at least two servers closer to you.
Next service on our list is Domain Name System (DNS). We will enable a DNS proxy on our router. The proxy forwards the requests to configured DNS servers (8.8.8.8 and 8.8.4.4) and maintains a cache entry for each resolved DNS query. The cached entries are used to speed up future queries. This reduces response time for DNS lookups for computers on our private network.
ip name-server 8.8.8.8
ip name-server 8.8.4.4
ip dns server
The last service to be enabled is Dynamic Host Configuration Protocol (DHCP).
rcp(config)#service dhcp
rcp(config)#ip dhcp server
rcp(dhcp server)#dns-server 10.1.10.1
rcp(dhcp server)#ntp-server 10.1.10.1
rcp(dhcp server)#network 10.1.10.0/24
rcp(dhcp 10.1.10.0/24)#range 10.1.10.50 10.1.10.250
rcp(dhcp 10.1.10.0/24)#default-router 10.1.10.1
rcp(dhcp 10.1.10.0/24)#lease 0 4 0
The lease time is set to 4 hours, and leases are assigned in 10.1.10.50 to 10.1.10.250 range. Our interface eth1 10.1.10.1 is advertised as default route, NTP server and DNS server.
Full configuration
This concludes our configuration. We need to make sure we save the configuration on hard disk in case we need to restart the router:
rcp(config)#copy run start
This is the configuration for our NAT router:
rcp#show configuration
hostname rcp
ip name-server 8.8.8.8
ip name-server 8.8.4.4
ip dns server
!
service telnet
service http encrypted password HMNRYBDP$784691c70a0fa7af5f031d338d2b9725
administrator rcp encrypted password  URCPKGVR$AOt0VUFzM8m12f9C361Ro1
!
service dhcp
ip dhcp server
  dns-server 10.1.10.1
  ntp-server 10.1.10.1
  network 10.1.10.0/24
    range 10.1.10.50 10.1.10.250
    default-router 10.1.10.1
    lease 0 4 0
  !
!
ntp server nist1-nj.ustiming.org
ntp server nist1-pa.ustiming.org
ip ntp server
!
access-list 100 deny  10.1.10.0/24  any
access-list 100 deny  any  out-interface eth0
access-list 100 deny  any  any  new,invalid
access-list 101 deny tcp any  any 23 new,invalid
access-list 101 deny tcp any  any 80 new,invalid
!
ip nat masquerade 10.1.10.0/24 eth0
!
interface ethernet eth0
  ip address 192.168.20.20/24
  ip mtu 1500
  no shutdown
  ip access-group 101 in
  ip access-group 100 forward
!
interface ethernet eth1
  ip address 10.1.10.1/24
  ip mtu 1500
  no shutdown
!
interface loopback lo
  ip address 127.0.0.1/8
  ip mtu 16436
!
interface bridge br0
  ip mtu 1500
  shutdown
!
interface bridge br1
  ip mtu 1500
  shutdown
!
rcp#
HTTP access
RCP100 also provides an HTTP interface for configuration and statistics. You can access it by pointing your browser to eth1 interface address (10.1.10.1). Most of the configuration and statistics available in CLI are exposed in this interface.

HTML interface
Conclusion
The use of software-based routers has grown increasingly common. By reducing complexity and simplifying network management, eliminating vendor lock-in and dramatically reducing the cost of the necessary hardware, software-based routers will play a critical role in scaling data center operations.
Building a router out of a regular Debian box is not exactly difficult. RCP100 is free software, and it is easy to integrate into the software stack. On a typical x86 computer today it can route packets from several 1GB Ethernet interfaces at wire speed.
Related posts

Pingback: How to Install and Configure RCP100 Routing Suite on Debian 7 | Hallow Demon
Thanks for sharing this. Would like to ask if you’ve already tried pfSense? if so, what’s the difference? or is it better to use this, dedicated router? thanks again in advance…
I’ve never tried psSense. I understand it is based on FreeBSD and it is a full distribution. This one is a software package you install on Linux, any Linux. I guess RCP100 is a more generic router, while psSense is more of a dedicated firewall.
Pingback: How to Install and Configure RCP100 Routing Suite on Debian 7 | Debian-News.net - Your one stop for news about Debian
Pingback: How to Install and Configure RCP100 Routing Suite on Debian 7 - Debian Info
Pingback: Links 27/6/2013: Kubuntu to Deviate Further From Canonical, New Debian Derivatives | Techrights
Pingback: RCP100 (routing suite) on Wheezy | 0ddn1x: tricks with *nix