
Virtualization allows the creation of multiple virtual machines (VM) on top of an existing computer, each VM configured in a very specific way. All virtual machines run in parallel alongside the regular host applications, without affecting the host system. The type of virtualization I am currently using is Linux containers (LXC), a lightweight virtualization technology built into Linux kernel.
This is my third Debian virtualization article. In the first article, I’ve described the steps to create and run a basic virtual machine using LXC. In the second article I’ve isolated the VM on its own network segment, with its own TCP/IP networking stack. Both articles were dealing with server VMs, I’ve used Lighttpd as an example throughout my articles.
I will describe now how to run desktop applications such as Mozilla Firefox and LibreOffice in a virtual machine. I will use virtenv to build and run the VM. virtenv is a QT4 application released under GPLv2 license. It is basically a configuration wizard that allows you to configure and start the LXC-based virtual machines. Once the VM is started, you get a regular controlling terminal (xterm) and a desktop window running the lightweight Openbox window manager. In this window you can run your GUI applications, very similar to VMware Workstation or Oracle’s VirtualBox.

virtenv desktop and controlling terminal
Installation
This is sort of a problem for anybody doing virtualization work: the kernel features you need, are not in the kernel you have installed on your computer. The most requested feature in this case is OverlayFS.
OverlayFS allows you to place a copy-on-write layer on top of your host filesystem. This operation eliminates the need to build your VM filesystem either by downloading all packages, or mounting read-only your existing filesystem. The resulting filesystem in VM is persistent, you can modify it as you need to. When you start your VM, it will come back as you left it last time you shut it down. From inside the VM you cannot access the filesystem on the host, however, from the host you can access all the modifications in the virtual machine.
OverlayFS support is not currently in the latest Linux kernel. There was an attempt this year to bring it in kernel version 3.10, however it didn’t make it. Porting OverlayFS source code to the kernel you are already running is not exactly a simple job, a better solution is to find a kernel built already with OverlayFS support.
There are currently two major Linux distributions with OverlayFS support included in the kernel, Ubuntu and openSUSE. For me, as a Debian user, the obvious choice is to install the Ubuntu kernel. In “wheezy” I have a 3.2 kernel. The same kernel version is featured in Ubuntu 12.04 LTS. I download the latest 3.2 version from Ubuntu and install it using dpkg.
# wget http://security.ubuntu.com/ubuntu/pool/main/l/linux/linux-image-3.2.0-51-generic_3.2.0-51.77_amd64.deb
# apt-get install crda iw libnl-3-200 libnl-genl-3-200 wireless-regdb
# dpkg -i linux-image-3.2.0-51-generic_3.2.0-51.77_amd64.deb
One reboot later, I am running my new kernel. If I ever wanted to uninstall it, the command is apt-get remove linux-image-3.2.0-51-generic.
To compile and run virtenv, I also need to install the following packages:
# apt-get install qt4-dev-tools qt4-qmake openbox xserver-xephyr
Compilation follows the classic ./configure && make && make install Unix pattern. I start by downloading the latest source code version and
# tar -xjvf virtenv-X.Y.Z.tar.bz2
# cd virtenv-X.Y.Z
# ./configure && make && make install
Configuring the virtual machine
Start virtenv from command line as virtenv or from your menu (in System Tools). The program is structured as a simple wizard: pick up a name for your virtual machine and configure it.

Virtual machine configuration
You can specify the screen size, whether to start with an empty /home directory or not, and the network type. In the network section you can choose to run the host networking stack, or you can connect your container to up to four Linux bridge interfaces. When you are done configuring, save it and start the virtual machine.
Running the virtual machine
Although you can run servers in your VM, this is still a virtual desktop. Start your GUI applications from the controlling terminal, or use Openbox menu (right-click in an empty area of the screen) – all your applications should be in this menu.

Openbox menu
If for a reason or another you don’t like Openbox, you can shut it down and replace it with a desktop or window manager of your choice. This is an example of running a full KDE Plasma in the virtual desktop:

KDE Desktop Environment
All the programs installed on your computer are visible in the virtual machine. If you need more, you can add them using apt-get install. If sound and hardware acceleration are available on the host, they are also available in VM.
I use virtenv/LXC for testing new software, as an apt-get install in such a container remains in the container. In this way I can protect my workstation filesystem while experimenting with new software. Some time ago I did a memory comparison of more than 20 window and desktop managers – it was virtenv and LXC on Ubuntu 12.04. The OverlayFS setup allowed me to install all these VM/DEs without touching my computer filesystem – virtenv is supported on Debian, Ubuntu and openSUSE.
Usually, Java applications and programs I get in binary format, they all get the VM treatment. In these cases I also sanitize passwd, shadow, and group files in /etc directory. Some programs such as Skype are known to access your password file and your Firefox bookmarks. I guess if Microsoft does it, it is common industry practice.
Network isolation
The preferred way to isolate a desktop virtual machine on its own network is to create a Linux bridge interface, connect the VM to the bridge, and set up Network Address Translation using netfilter firewall. The final setup would look like this:
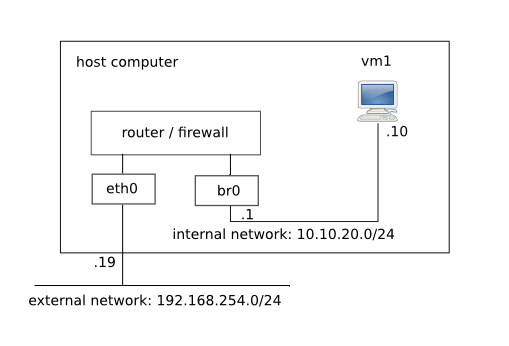
Network setup
This is a small script that allows you to create the network setup:
#!/bin/bash

#
# Network configuration script for a desktop vm
#

# bridge setup
brctl addbr br0
ifconfig br0 10.10.20.1/24 up

# enable ipv4 forwarding
echo "1" > /proc/sys/net/ipv4/ip_forward

# netfilter cleanup
iptables --flush
iptables -t nat -F
iptables -X
iptables -Z
iptables -P INPUT ACCEPT
iptables -P OUTPUT ACCEPT
iptables -P FORWARD ACCEPT

# netfilter NAT
iptables -t nat -A POSTROUTING -o eth0 -s 10.10.20.0/24  -j MASQUERADE
If you also have servers running in VM, you can make them visible on your external network using port forwarding. This is an example to forward port 80 (HTTP) from eth0 to your virtual machine:
# netfilter port forwarding
iptables -t nat -A PREROUTING -p tcp --dport 80 -j DNAT --to 10.10.20.10:80
With your network set up and running, start virtenv and connect your VM to br0.

Virtual machine configuration
Conclusion
Although virtenv and LXC are still under development, they work very well as a desktop VM. There are quite a number of other programs build around LXC, what they all require is OverlayFS support in Linux kernel. My kernel feature wish list also includes grsecurity and PaX, two security modules that help a lot in LXC deployments. Maybe one day these features will be included officially in Linux kernel.
As mentioned in my other articles, LXC is basically a chroot on steroids and it doesn’t promise anything regarding security. This can be changed on production boxes usually by setting each virtual machine on its own isolated network, and running mandatory access control (SELinux, AppArmor) on the applications inside the containers.
Related posts

Pingback: Debian Virtualization: LXC Desktop Virtualization | Debian-News.net - Your one stop for news about Debian
Pingback: Debian Virtualization: LXC Desktop Virtualization - Debian Info
Pingback: Debian Virtualization: LXC Desktop Virtualization | Hallow Demon
Pingback: LXC on Debian (3) | 0ddn1x: tricks with *nix
When trying to install virtenv with ‘./configure && make && make install’ it throws an error:
checking for main in -lQtCore… no
configure: error: *** QtCore library not installed – please install QT4 first ***
although there are qt4 and qt5 folders in usr/lib/x86_64-linux-gnu (I’m on Mint Mate 64bit). How can I make it searching at the right folder? Thanks.
I didn’t look in it for quite a while. I don’t think it was ported to the newer Debian/Ubuntu/Mint versions.
Thanks for the quick reply. Not sure if the link is trustworthy but I found a newer version that works on Mint 17.2 64bit here: https://en.osdn.jp/projects/sfnet_virtenv/releases/
Thanks, I was looking for something that would work on Debian jessie!